Step-by-Step Tutorial: How to Replace & Install an Electric Water Heater with Hard Water Protection in Tenerife
Masterclass tutorial for replacing 30L to 100L electric water heaters in Tenerife homes: dielectric unions, pressure relief valves, 100kg heavy-duty wall anchors and dry-fire prevention.
Informational Notice: This tutorial and its instructions are provided strictly for general educational and informational purposes. They do not constitute binding technical advice or formal engineering recommendations. If you lack prior experience or tools, we advise contacting a certified Handyman Tenerife professional.
Before You Begin: Safety Protocol
- 1. Cut off the electrical power supply from the main breaker panel (switch off the dedicated water heater circuit).
- 2. Shut off the main water valve or the local isolation stopcock.
- 3. Open hot water taps in the nearest sink/bidet to completely depressurize the circuit.
- 4. Drain the old heater: flip the safety valve lever or loosen the cold inlet flex hose with a bucket underneath until empty.
📦 Materials Required
- ✓ New electric water heater with manufacturer wall bracket
- ✓ 2 dielectric anti-electrolysis unions (1/2" brass/polymer)
- ✓ 1 pressure relief and check safety valve (8 bar) with manual purge lever
- ✓ 2 heavy-duty stainless steel braided flexible hoses (1/2" female-female)
- ✓ High-density PTFE thread seal tape or plumbing hemp paste
- ✓ Chemical anchor kit or M10 steel expansion hooks with wide washers
- ✓ Flexible PVC drain tube to guide safety valve overflow to a drain
🛠️ Recommended Tools
- 🔧 Hammer drill with 10mm / 12mm masonry carbide bit
- 🔧 Large adjustable wrench (250mm) and plumbing spanners
- 🔧 Spirit level or laser level
- 🔧 Flathead screwdriver and electrical voltage tester
- 🔧 Drain bucket, towels and microfiber cloths
- 🔧 Chemical anchor caulking gun (if applicable)
📋 Step-by-Step Project Guide
Step 1: Disconnection and removal of the old water heater
Once the tank is fully drained, unscrew the flexible supply hoses and disconnect the electrical power wires, verifying first with a voltage tester that no current is live. With a second person, lift the old unit off its wall brackets and remove it safely.
Residual water inside the base often contains rusty sludge; keep a bucket and towel ready to protect tiles.
Step 2: Marking and heavy-duty bracket mounting
Measure the mounting bracket hole spacing on the new unit and mark the holes on the wall using a spirit level. Drill with a masonry hammer drill and fit the M10 structural expansion anchors or threaded rods, tightening firmly.
For hollow Canary volcanic block walls, inject chemical resin sleeves and allow 20 min cure time before hanging.
Step 3: Fitting dielectric unions & pressure relief safety valve
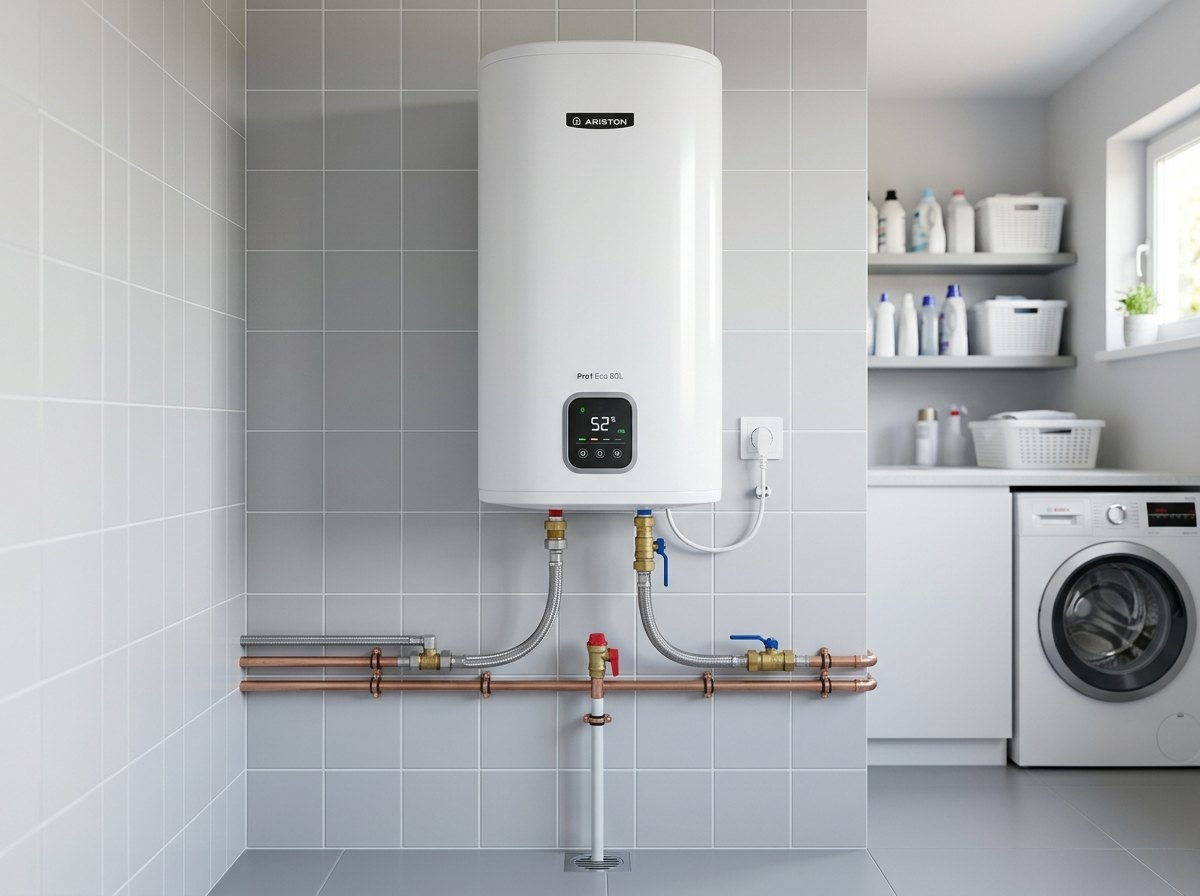
Wrap high-density PTFE Teflon tape clockwise onto the male threads of the tank inlets. Screw one dielectric anti-electrolysis union onto the hot water outlet (red) and one onto the cold inlet (blue). On the cold inlet, screw the 8-bar pressure safety valve onto the dielectric union.
Dielectric unions are strictly essential in Tenerife: they isolate copper from steel, preventing galvanic corrosion.
Step 4: Hydraulic plumbing connection and relief drain pipe
Hang the new water heater onto the wall brackets. Connect the new stainless steel flex hoses: cold water inlet into the safety valve, and hot water outlet into the household hot pipe. Fit a small clear PVC tube to the valve overflow nozzle.
Do not over-torque the hose nuts; hand tight plus a 1/4 spanner turn gives a perfect watertight seal.
Step 5: Tank filling, air bleeding and electrical power up
Open the cold water supply valve to fill the tank. Open a hot water tap in the house: air will sputter out. When a solid, continuous stream of water flows, close the tap. Check all fittings for leaks. ONLY THEN plug in the electrical power and switch on the circuit breaker.
CRITICAL: Never turn on power before the tank is completely full of water, or the heating element will burn out in seconds (dry fire).
📊 Technical Specifications Sheet
| Recommended capacity | 50L (1-2 persons) / 80L-100L (3-4 persons) |
|---|---|
| Max working pressure | 8 - 9 bar (Safety valve mandatory) |
| Heating element type | Steatite / sheathed element (Immune to calcification) |
| Total wall load (full) | Approx. 115 kg for 80-liter unit |
🧱 Wall Anchor Selection Guide for Tenerife
Hollow volcanic cinder block (Canary picón masonry)
Recommended Plug: Chemical injection resin + nylon mesh sleeve + M10 zinc-plated threaded rod
💡 Never use standard plastic wall plugs in hollow volcanic blocks; chemical anchor sleeves are mandatory to hold water weight.
Solid brick or reinforced concrete wall
Recommended Plug: M10 steel expansion hook bolts or Fischer FSL 12x60mm anchors
💡 Scan wall with a pipe/cable detector before drilling to avoid hitting buried water supply lines.
🧹 Maintenance & Aftercare Tips
- Set thermostat to 55°C - 60°C: optimal temperature to prevent legionella while reducing limescale calcification by 40%.
- Inspect the sacrificial magnesium anode every 18-24 months in hard water areas of Tenerife.
- Flick the safety valve test lever every 6 months to flush sediment and prevent the valve from seizing.
- Consider a polyphosphate filter on the cold inlet to double the lifespan of your heating element in the Canary Islands.
❓ Frequently Asked Installation Questions
Q: What size electric water heater do I need in Tenerife?
A: For 1 person, 30L or 50L is sufficient. For 2 persons, 50L or 80L is ideal. For families of 3-4 or holiday rental apartments, an 80L to 100L model ensures consecutive hot showers without delays.
Q: Why do water heaters fail frequently in Tenerife?
A: Tenerife water has high concentrations of mineral salts and limescale. Without proper dielectric unions and regular magnesium anode checks, galvanic corrosion quickly oxidizes the steel tank or burns the element.
Q: Can I install a vertical water heater horizontally?
A: No, unless the model is explicitly certified as 'Multi-position / Reversible'. Installing a vertical tank horizontally causes faulty thermostat readings and poor hot water stratification.
Electric Water Heater Installation & Replacement in Tenerife
Fast replacement of 30L to 100L electric water heaters with dielectric fittings and heavy-duty anchors.
Prefer a professional handyman to install it for you?
Save time and tool costs. At Handyman Tenerife, we come equipped with professional materials and specialized anchors for your exact wall type.
💬 Request Quote via WhatsApp (+34 657 674 026)